The Arduino Uno is a versatile piece of hardware that can turn any hobby project into a technical marvel. We can assume that since you are here you are at least familiar with the platform, but you may have questions about the voltage rating of the individual pins on your board.
The Arduino Uno inputs can work with 3.3V and 5V devices, however, the board only outputs 5V, but keep reading to find out voltage ratings for other Arduino models and the recommended input voltage ranges.
In this post, we will talk about:
- The maximum voltage rating of the individual pins on the Arduino Uno.
- Do these ratings change with different supply voltages?
- Where to look for more in-depth info.
Let’s dive into this and see just what your little board will do!
What are the max voltage ratings of individual pins on my board?
As we said in the beginning, the pins on the Arduino Uno can output 5V in an either on or pulse width modulation state.
The voltage that you can input or output from any pin on the Arduino Uno is 5V. One interesting thing to note is that the absolute maximum input voltage is actually 5V+0.5V due to the input protection diodes. If you are interested in what the input port protection looks like, you can check “I/O Pin Equivalent Schematic” in “I/O Ports” section in ATmega328P datasheet here.
While the inputs of Arduino Uno and other 5V devices (see Table 1) can work with 3.3V devices, you might run into some issues with high-speed devices. Additionally, if the 3.3V device’s high output signal has a lower voltage than the lower limits of the input high lower limit, then it is possible that the input will not register the high logic level at its input. For the 5V output, you can use a resistor divider to lower the 5V logic signal to a 3.3V logic signal.
A comparison of maximum I/O (Input/Output) voltage for some of the most popular Arduino boards can be found below in Table 1:
| Board (see Tech Specs) | I/O voltage | Recommended input voltage range | Absolute maximum input voltage range |
| Arduino Uno | 5V | 7-12V | 6-20V |
| Arduino Nano | 5V | 7-12V | 6-20V |
| Arduino Mega | 5V | 7-12V | 6-20V |
| Arduino Zero | 3.3V | 5-18V | 6-20V |
| Arduino Leonardo | 5V | 7-12V | 6-20V |
| Arduino Micro | 5V | 7-12V | 7-20V (see Power) |
| Arduino Due | 3.3V | 7-12V | 6-16V |
Do these ratings change with different supply voltages?
If you use a good high-quality power source, the output ratings should be relatively stable. The output of 5V should not change significantly if you stay within the recommended voltage range.
There are several ways that you can power your Arduino Uno. There is the USB port, the 2.1mm center-positive barrel jack, and the VIN header pin. The official documentation (see Tech Specs) states that the recommended minimum input voltage for barrel jack and VIN is 7V and the maximum input is 12V. Let’s look at the ways you can supply power to your Arduino Uno in more detail:
- 1. USB:
- When using a good quality USB power supply, the board receives the 5V needed as a pass-through without regulation.
- 2. 2.1mm jack:
- The barrel jack input voltage can range from 7V to 12V (recommended). It then passes through a voltage regulator to bring it down to the 5V needed for operation. As it uses voltage regulation, you can connect a battery source here to power the board.
- 3. VIN pin:
- The VIN pin is almost the same power connection as the 2.1mm jack (the 2.1mm jack has a diode before the VIN pin connection). As previously mentioned, the voltage on this pin can range from 7V to 12V (recommended) and is regulated down to the 5V the board operates at. You can connect wires from a battery power source here to power the board. If you are supplying power through the barrel jack, you can access this power source from this pin as well, if needed!
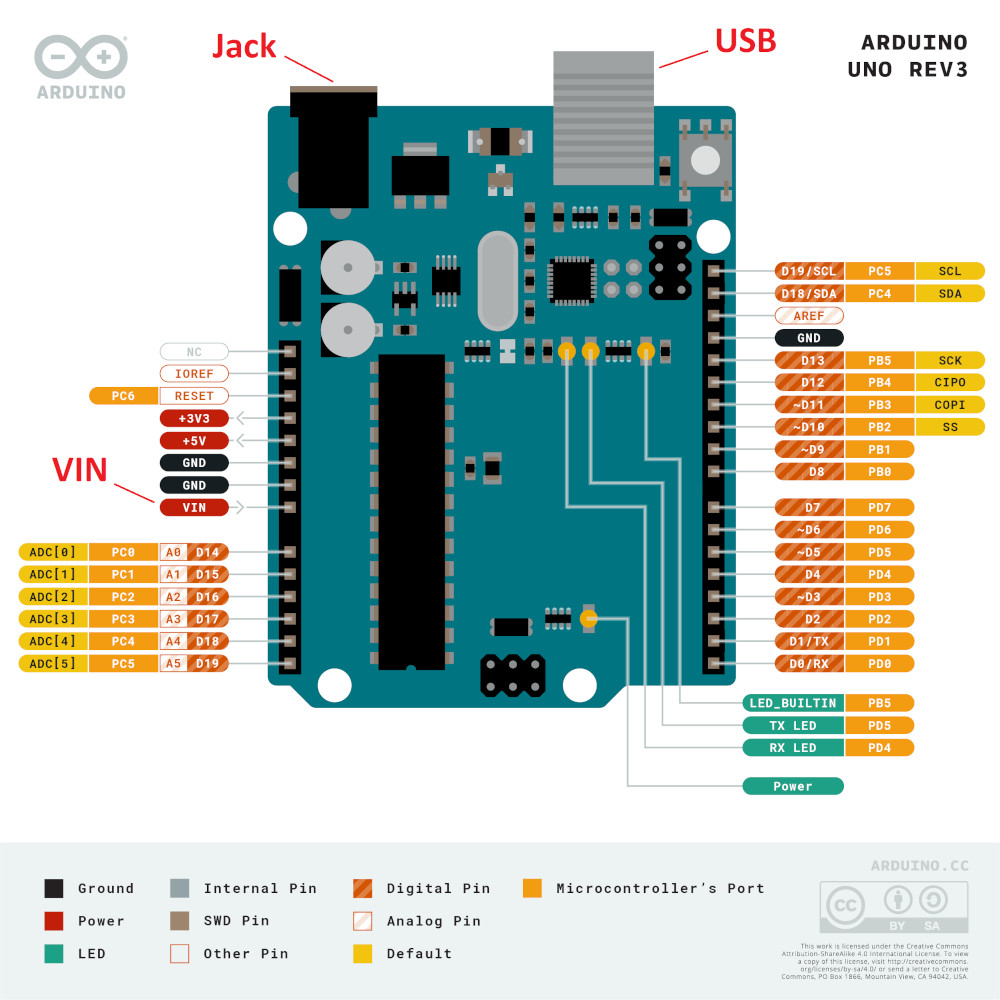
Below, in Figure 1, you can see the pinout diagram for Arduino Uno so you can see where the VIN pin is and in the upper left you can see the 2.1mm jack, the upper right is the USB port.
The Arduino Uno has an absolute maximum input voltage range from 6V to 20V, however, there are some problems that could arise from running outside the recommended range. If you supply less than 7V (using the 2.1mm jack or VIN pins) the board may not supply a full 5V to the 5V pin and the board could become unstable causing your project to behave erratically or not operate at all. If you supply more than 12V, the internal regulator could overheat and fail, causing serious damage to the board and possibly any sensors connected to it.
In Table 1 (see above) you can see a comparison table of input voltage ranges for the most popular Arduino boards.
Where to look for more in-depth info?
As always, when looking for info related to your specific board, it’s best to start with the official documentation. The Arduino website goes deep into the specs and also has fun and easy beginner projects to try out.
The datasheet for the Arduino Uno and other boards are great resources as well. It contains all the technical details to get you started.
If you want to test your pins with a multimeter, there are some dangers you should be aware of when using it. Go and read Can You Damage Electronics With A Multimeter? before you get started.
Conclusion
In this post, we talked about the I/O voltage ratings and the input voltage ranges for the Arduino board family, if that rating changes based on supply voltage, and where you can find more info. We discovered that the max voltage that your Arduino Uno can output is 5v and that the rating on this particular board does not change based on the input voltage. We saw that most of the Arduino board family is 5V operated and their recommended input voltage range is similar across all of the devices.
The world of small electronics is vast and there is so much info to wade through, we thank you for giving us a chance to share our knowledge with you. Thank you for reading and we look forward to the comments and questions!
Leave a Reply